Btrfs on dm-crypt
An in depth guide to installing Btrfs raid on top of encrypted volumes
Two of the most important and exciting tools for data storage that Linux has to offer are disk encryption via dm-crypt, and built-in RAID, copy-on-write, and other modern storage features via the Btrfs file system. Both dm-crypt and Btrfs have volumes of information written on them, however, when I bought a shiny (on second thought, matte) new ThinkPad 450s with 3 SSDs and set out to implement a system utilizing both features, I had trouble connecting the information into a cohesive process. I learned a lot from this installation and hope this tutorial will be helpful in providing a clear guide to a system with Btrfs RAID on top of dm-crypt.
Who This Tutorial is For
This article is written with a few assumptions. First, I assume that you have a general comfortability with the command line, as these steps have to be executed in a manual or “guided” CLI installation. Second, this tutorial is written for Arch Linux, however, the majority of the article will remain distro-agnostic as the main steps only concern disk setup and the boot process.
Brief Description of the Setup
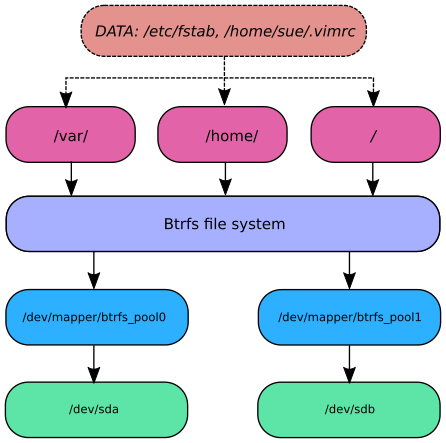
To effectively describe how data is organized, processed, and stored, we will follow a file as it traverses down the data hierarchy to the disk. First, when we write a file, it will be stored inside of a directory, such as /etc/ or /home/sarah/ (indicated in the figure below as orange). That directory resides in a subvolume (kind of like a virtual partition, or LVM volume), such as “home”, “var”, or “etc” (magenta). Each subvolume is a member of the Btrfs pool (lavender), which consists of one or more device mappings (blue). These devices are dm-crypt containers that act as an intermediary step, encrypting the data before finally writing it to a particular hard drive (green).
Attribution
Much of the information from this article was stitched together from the Arch Wiki, primarily the page on Btrfs, and the series on dm-crypt. The use of the encrypt2 hook comes from a comment by AUR user benke, Btrfs subvolume organization and mounting the Btrfs top level subvolume to /var/lib/btrfs_root comes from the Arch Forums user WorMzy’s excellent post. Additional Btrfs insight and clarification was gained from Marc Merlin’s Linuxcon 2014 talk “Why you should consider using Btrfs, real COW snapshots and file level incremental server OS upgrades.”
Contents
- Preparation
- Partitioning the Disks
- Setting Up dm-crypt
- Creating the Filesystems
- Mounting the Btrfs Filesystem and Creating Subvolumes
- Assembling the / Filesystem
- Proceeding with Installation
- Setting Up initramfs
- Setting the Boot Options
- Post Installation Considerations and Niceties
- Conclusion
Preparation
Once you’re booted into a live environment, you’ll want to run lsblk to find
and verify the disks you will be working with based on their size and any
partitions on them. Since the naming of devices can
change, you should double check the devices if you reboot. If there are any
partitions or disks that have important data on them, back them up now.
Securely Wiping the Disks
To ensure that no sensitive data remains on hard drive, the disk will be overwritten with random data. To accomplish this, we will open temporary encrypted containers on each disk and write data to the entire disks.
First, use cryptsetup to set up the containers on each device to be
used. The following command creates a dm-crypt plain container for each partition (specified as dev/sdXY) or
disk (specified as /dev/sdX), named
container_0, container_1, …, container_n.
# cryptsetup open --type plain /dev/sdXY container_nNow that an encrypted container has been opened on each disk, any data
written to it will appear to be suitably random. Therefore, you can use /dev/zero to
generate data as it is much faster than /dev/urandom, which on my machine is ~100 times
slower to read from. To overwrite to disk, simply execute the following dd
command for each dm-crypt container you created.
# dd if=/dev/zero of=/dev/mapper/container_XYSince writing a whole disk can take a long time, you can speed the process up by opening a new virtual terminal by pressing Ctrl+Alt+F2 and then executing the command on another disk. Note, it would not be effective to do this on two partitions of the same disk, as the bus of one device would be handling both loads.
If you are curious as to how the operation is progressing, simply open a new virtual terminal and execute
# watch -n 20 kill -USR1 $(pidof dd)Then switch back to the virtual console of the dd command for updates every 20
seconds. When the operation is done, switch back to the terminal you executed
watch in and press Ctrl+c.
Once every dd operation has completed, you can proceed on to the actual installation. I find that the easiest way to clean up the installation environment of the containers is to simply reboot.
Planning Your Disk Layout
Now you have to decide how exactly to layout the partitions and drives. In every case you will need a boot partition. Depending on your needs and the number of disks in your system, there a few considerations to be had. With one disk, the only partitioning considerations are whether or not you would like a swap partition (note: hibernate will not be possible with btrfs and dm-crypt) and/or additional free space for other operating systems. With two or more disks, you can utilize the built in RAID features of Btrfs. There are three options for btrfs raid:
-
RAID 0 - Data is striped, or distributed across all disks.
- Pros:
- Write/Read speed increased because disks are accessed in parallel
- Total usable space is equal to that of the disk combined
- Cons:
- No redundancy. If one disk fails, entire filesystem is unusable.
- Pros:
- RAID 1 - Data is mirrored, or copied to both devices.
- Pros:
- Resiliency. All but one drive can fail without harming the filesystem
- Cons:
- Total usable space is equal to that of the smallest disk
- Read/Write speed is equal to that of the slowest disk.
- Pros:
- RAID 1+0 - Data is striped and mirrored, as if a two or more RAID 1 pools were RAID
0’ed together.
- Pros:
- Resiliency. All but one drive from each RAID 1 pool can fail without harming the filesystem
- Write/Read speed increased because disks are accessed in parallel
- Total usable space is equal to that of each RAID 1 pool combined
- Cons:
- Requires 4 or more disks
- Could have way more redundancy with 4 disks in RAID 1
- Could have way more data throughput with 4 disks in RAID 0
- Pros:
Clearly there is no correct choice for every situation. In a file server where data integrity is key, go with RAID1 or RAID10. On a desktop or laptop workstation, RAID0 can greatly benefit one’s user experience. If you chose RAID 0, be sure to keep ample off-machine backups!
Partitioning the Disks
For remainder of the tutorial, I will write as though you are using two disks of different sizes in RAID0, a pretty common setup for one’s first foray into RAID :)
- /dev/sda: 128G
- /dev/sdb: 120G
For /dev/sda, create a 120G partition for one half of the btrfs pool, a 7.5G swap partition and a 500M boot partition.
# fdisk /dev/sda
Command (m for help): n
Partition number: <enter>
First sector: <enter>
Last Sector: +120G

Command (m for help): n
Partition number: <enter>
First sector: <enter>
Last Sector: +7.5G

Command (m for help): t
Partition number: <enter>
Hex code: 14

Command (m for help): n
Partition number: <enter>
First sector: <enter>
Last Sector: <enter>

Command (m for help): t
Partition number: <enter>
Hex code: 1

Command (m for help): w
Since btrfs can reside on either a partition or an entire disk, you do not have to partition /dev/sdb since you will be using the whole disk.
Setting up dm-crypt
With the disks partitioned, you can now setup the dm-crypt containers before installing the filesystems. You will have to set up two containers, one for each of the disks in the btrfs pool: /dev/sda1 and /dev/sdb.
dm-crypt has two types of containers with different benefits, “plain” and “luks”. The plain encryption sets up a “dumb” container. It has no knowledge that it is even encrypted until you open it, specifying every relevant parameter each time (keysize, cipher, hash). LUKS on the other hand, places a header on the disk that is aware of the parameters it was encrypted with and allows from multiple decryption keys. While LUKS seems like the obvious choice, one may decide to use plain if plausible deniability is a concern, as the disk will appear as simply random data to an adversary. For this tutorial, I will proceed using LUKS.
Creating the Containers
Different machines have different hardware support for the various crypto
hashes and ciphers, so to find what settings will work best for you, check the
results of the cryptsetup benchmark command.
# cryptsetup benchmark
# Tests are approximate using memory only (no storage IO).
PBKDF2-sha1      1178175 iterations per second
PBKDF2-sha256     755458 iterations per second
PBKDF2-sha512     613920 iterations per second
PBKDF2-ripemd160  678250 iterations per second
PBKDF2-whirlpool  252061 iterations per second
#  Algorithm | Key |  Encryption |  Decryption
     aes-cbc   128b   611.1 MiB/s  2632.0 MiB/s
 serpent-cbc   128b    81.7 MiB/s   521.5 MiB/s
 twofish-cbc   128b   181.6 MiB/s   333.4 MiB/s
     aes-cbc   256b   453.3 MiB/s  2011.5 MiB/s
 serpent-cbc   256b    82.9 MiB/s   523.0 MiB/s
 twofish-cbc   256b   183.9 MiB/s   334.6 MiB/s
     aes-xts   256b  2240.3 MiB/s  2236.9 MiB/s
 serpent-xts   256b   520.6 MiB/s   506.5 MiB/s
 twofish-xts   256b   325.5 MiB/s   330.1 MiB/s
     aes-xts   512b  1732.0 MiB/s  1714.2 MiB/s
 serpent-xts   512b   520.0 MiB/s   506.3 MiB/s
 twofish-xts   512b   325.7 MiB/s   329.8 MiB/s
What one wants is the best balance of strength to performance. In terms of the hashes, less iterations per second is stronger, as it increases the amount of time needed to decrypt, which decreases the ability to brute force. Though by that metric whirlpool seems best, sha256 is considered suitable secure and quite standard. For the cipher, aes-xts clearly has the best performance on this computer. As a compromise of strength and speed, I will go with 256 bit aes-xts.
Based on those choices, the resulting cryptsetup command is
# cryptsetup --key-size 512 --hash sha256 --iter-time 5000 --use-random luksFormat /dev/sda1-
The reason that the key size is 512 although we decided on 256 is explained on the Arch Wiki article on dm-crypt encryption:
XTS splits the supplied key in half. So to use AES-256 instead of AES-128 you would have to set the XTS key-size to 512.
-
The
--iter-timeoption sets how long we spend hashing the passphrase. At 755458 iterations per second, the number of iterations is 755458*5=3777290. -
By default cryptsetup 1.6.2 uses aes-xts, so the –cipher option is unnecessary.
-
The
--use-randomspecifies to use /dev/random as an entropy (randomness) source as opposed to the default of /dev/urandom. The reason for this is that on a fresh, live environment, /dev/urandom may not have suitable entropy.
Upon executing the command, you will be prompted to enter a passphrase, pick one that is sufficiently strong.
Repeat the command for any remaining partitions of the btrfs pool, in this case just /dev/sdb. When prompted for a passphrase, it is best to enter one different from the other disk’s, as both passphrases are necessary to decrypt the btrfs pool. If using RAID1, the same passphrase could perhaps be used, as knowing either passphrase can access the pool.
Opening the Containers
Now, the LUKS containers have to be opened in order to use them as block
devices. Once opened, the containers reside in the filesystem as /dev/mapper/container_name.
The syntax for the cryptsetup open command is
# cryptsetup open --typeluks /dev/sdXY <container_name>Where container_name is an arbitrary name for the container. We will use “btrfs_pool0” and “btrfs_pool1” for organizational purposes, so the commands are
# cryptsetup open --typeluks /dev/sda1 btrfs_pool0
# cryptsetup open --typeluks /dev/sdb btrfs_pool1
Run ls /dev/mapper and verify that both containers are there.
Creating the Filesystems
There are three filesystems to create in this setup: boot, swap and the btrfs pool. First create the boot partition.
If using a legacy BIOS motherboard, you can simply run mkfs.ext3 /dev/sda3.
If you are on a computer with UEFI, you will need a EFI System Partition with a FAT32
filesystem, which can be created by running mkfs.fat -F32 /dev/sda3.
To create the swap partition, simply run mkswap /dev/sda2 and then swapon
/dev/sda2.
To create the btrfs filesystem use the mkfs.btrfs command. You will need to
specify the RAID level for both the data (-d) and the metadata (-m). We are using RAID0
for the data, but for the metadata we will use RAID1 so that it resides on both
disks. Since metadata is both small and important, this is a good measure that
results in virtually no performance loss.
# mkfs.btrfs -m raid1 -d raid0 /dev/mapper/btrfs_pool0 /dev/mapper/btrfs_pool1Mounting the Btrfs Filesystem and Creating Subvolumes
Normally in an Arch Linux install, you would mount the root device to /mnt and begin constructing the filesystem hierarchy, but first we are going to utilize one of the coolest features of btrfs, subvolumes!
Subvolumes are kind of like partitions, except much more flexible. You do not have to specify a fixed size when creating a subvolume, although you can set disk quotas for each subvolume (for example, limit the size of each home folder). Arguably, the best feature of subvolumes is snapshots. A snapshot is like a backup of the subvolume at some point in time that is extremely fast and space efficient as it only stores changes from one point to another, also known as delta backups. This is made possible by the copy-on-write mechanism of btrfs.
To begin creating the various subvolumes, first make a directory to mount the
btrfs pool: mkdir /mnt/btrfs. Now, mount either of the btrfs_pool containers
to this directory (it does not matter which one you choose).
# mount /dev/mapper/btrfs_pool0 /mnt/btrfsThere are two common layouts of subvolumes: the parent method, and the sibling method. In the parent method, one would create a subvolume called “root” and inside of it place others, such as “home” (which could contain the subvolumes “alice” and “bob”), “etc” and “var”. This may seem more traditionally intuitive, but other than some ease in initial mounting during installation, it actually less ideal in terms of snapshotting, as you’ll see later. The sibling method places all snapshots at the same level of the core btrfs filesystem. The “root” subvolume, which will later be mounted as /, is at the same level of the subvolume hierarchy as “bob”, “alice”, “etc”, “var”, and so on. This makes snapshotting nicer in terms of scripting as all subvolumes live in the same directory.
Change your working directory to the btrfs mountpoint with cd /mnt/btrfs so
you can easily create the subvolumes.
You create subvolumes using the btrfs subvolume create command with the syntax
# btrfs subvolume create <subvolume name> <location>You will need to make a “root” subvolume, but other than that, it is up to you to decide what subvolumes you would like to create. For a desktop use-case, you may want a “home” subvolume if you are the only user, or, if not, then a subvolume for each user. A “var” subvolume can be handy for package management purposes, and perhaps you will want a “data” subvolume for shared files, such as music and movies. In a server scenario, you may want an “opt” subvolume for various services. I will demonstrate with the subvolumes I used (again, in the /mnt/btrfs/ directory):
# btrfs subvolume create root .
# btrfs subvolume create home .
# btrfs subvolume create var .
# btrfs subvolume create data .
Now run btrfs subvolume list . and verify that they are all there. You should
see output similar to:
# btrfs subvolume list .
    ID 259 gen 6244 top level 5 path home
    ID 260 gen 4778 top level 5 path data
    ID 271 gen 5976 top level 5 path root
    ID 272 gen 6219 top level 5 path var
Now that the subvolumes are created, we can move on to assembling the filesystem hierarchy, just like in a traditional multi-partition install.
Assembling the / Filesystem
Begin by changing your working directory to /mnt/
# cd /mntNow create a directory that will be the mount point for the root filesystem
(just as you would mount you / partition to /mnt or /mnt/arch in a normal
installation) with mkdir /mnt/arch
A Bit about Btrfs Mount Options
You may have used some options with the mount command before such as noatime or defaults. Btrfs has some additional options to specify some of its features, most notably:
- ssd: enables various optimizations for solid state disks
- compress= : enables on the fly compression of the data before writing it, which uses less space and often, on modern hardware, is actually faster than non-compressed as hard drives (even SSDs) remain the bottleneck in data storage. The available choices are zlib (better compression) or lzo (faster compression)
- subvol= : specify which subvolume is to be mounted
Mounting the Subvolumes and /boot Partition
The first step is to mount the “root” subvolume to the /mnt/arch directory, with any options you may want.
# mount -t btrfs -o defaults,noatime,ssd,compress=lzo,subvol=root /dev/mapper/btrfs_pool0 /mnt/archNow make the necessary directories that will be mount points for the other subvolumes and partitions:
# mkdir /mnt/arch/{boot,data,var,home}And finish mounting the devices
# mount -t btrfs -o defaults,noatime,ssd,compress=lzo,subvol=home /dev/mapper/btrfs_pool0 /mnt/arch/home
# mount -t btrfs -o defaults,noatime,ssd,compress=lzo,subvol=data /dev/mapper/btrfs_pool0 /mnt/arch/data
# mount -t btrfs -o defaults,noatime,ssd,compress=lzo,subvol=var /dev/mapper/btrfs_pool0 /mnt/arch/var
# mount -o defaults,noatime /dev/sdc3 /mnt/arch/boot
There are two modifications we will now make to improve filesystem cleanliness and ease of btrfs administration. First, since log files are written to extremely frequently, you will want to disable copy-on-write for them to avoid fragmentation of thousands of unnecessary log file revisions.
# mkdir /mnt/arch/var/log/
# chattr +C /mnt/arch/var/log/
The second modification you’ll make will help with later snapshotting and other btrfs operations. Remember how easy creating subvolumes was when you mounted the top level btrfs pool to /mnt/btrfs? You can retain this functionality by mounting the btrfs pool with no “subvol” option somewhere in your filesystem. I will do this at /var/lib/btrfs_root, but you are welcome to place this where ever you like, such as /data/btrfs_pool.
# mkdir /mnt/arch/var/lib/btrfs_root
# mount -t btrfs -o defaults,noatime,ssd,compress=lzo /dev/mapper/btrfs_pool0 /mnt/arch/var/lib/btrfs_root
Proceeding with Installation
Now that the filesystem is assembled, you can essentially follow the rest of the Arch Installation guide with only a few slight differences.
Executing pacstrap
When running the pacstrap command, you need to include an additional package in order to have the btrfs tools you have been using. Also, since you mounted your filesystem at /mnt/arch instead of /mnt/ as used in the guide, you need to account for that:
# pacstrap /mnt/arch base btrfs-progsGenerating the fstab File
In order for the system to properly locate and mount all of the partitions and
subvolumes at boot, a filesystem table needs to exist. Arch Linux
has a great tool for simplifying the process, genfstab.
Although the Arch installation guide does not specify this option, the ‘-U’ flag is quite
important, since the order the devices are recognized could change (switching
what is /dev/sda and /dev/sdb for example). This is crucial if you decide
to have an encrypted swap partition, which we’ll cover later.
Before writing the fstab to new installation, first run it without the output
redirection (“»”) and verify it against ls -l /dev/disk/by-uuid
# genfstab -p -U /mnt/arch
# ls -l /dev/disk/by-uuid
If everything looks good, write it to the new installation
# genfstab -p -U /mnt/arch >> /mnt/arch/etc/fstabFurther Configuration
Run arch-chroot /mnt/arch to chroot into the new system and follow the steps
in Configure the
System
until Configure /etc/mkinitcpio.conf, where you will need to make some slight
modifications.
Setting Up initramfs
In order to decrypt devices when starting the system, you need to include the “encrypt” hook in your initramfs. There is a slight problem though, in that the encrypt hook only allows you to specify 1 device to decrypt. Since your btrfs pool consists of 2 or more devices this will need some modifications. The “encrypt” hook is really just a shell script that lives at /lib/initcpio/hooks/encrypt, with a corresponding install script that lives at /lib/initcpio/install/encrypt.
All you need to do is create copies of the two scripts make some slight modifications.
Creating Additional encrypt hooks
# cp /lib/initcpio/hooks/encrypt /lib/initcpio/hooks/encrypt2
# cp /lib/initcpio/install/encrypt /lib/initcpio/install/encrypt2
The install/encrypt2 script is fine as-is, but you need to make some slight adjustments to /lib/initcpio/hooks/encrypt2. Using your favorite text editor, change every occurrence of “$cryptkey” to “$cryptkey2” (there should be 2 occurrences), and “$cryptdevice” to “$cryptdevice2” (2 occurrences). Additionally, find the line “mkdir /ckey” and remove it to avoid an annoying but harmless error message upon startup.
If you are using more than 2 encrypted disks for your pool, simply repeat the process for encrypt3, encrypt4, etc.
Editing /etc/mkinitcpio.conf
Now it is time to tell the initramfs to include the necessary components upon
being built. Open up /etc/mkinitcpio.conf in your favorite text editor. Find
the MODULES="" line and change it to MODULES="nls_cp437 crc32c" note: if
you would like to use a keyfile to automatically unlock your devices on boot
when in a safe place, include the kernel module for the unencrypted filesystem
it will reside on, such as vfat or ext3. Setting this up will be covered later
in the tutorial.
Now find the uncommented line beginning with HOOKS= and change it to
HOOKS="base udev autodetect encrypt encrypt2 modconf block filesystems keyboard
fsck btrfs"
in that order.
Now simply run mkinicpio -p linux to generate the initramfs.
Setting the Boot Options
In order to decrypt the disks and mount the “root” subvolume to /, you need to set a few kernel options in your boot loader configuration. The specifics may be slightly different depending on your choice of bootloader, but generally there is an “options” line in the configuration for each boot entry.
To unlock the encrypted LUKS containers, use the cryptdevice= and
cryptdevice2= (and any additional) options from your encrypt hooks. The format
for this option is
# cryptdevice=UUID=<uuid-of-disk-or-partition>:<name-of-encryption-container>:allow-discardsAgain, because device names of the form /dev/sdXY can change, UUIDs should be
used. I find it helpful to append all of the disk UUIDs to the end of the boot
entry for easy copy and pasting: ls -l /dev/disk/by-uuid/ >>
/path/to/boot/entry, just be sure to delete all of the lines appended by ls
before saving the file!
To indicate that you want to mount your Btrfs pool’s “root” subvolume as /, use
the standard root= parameter but also include a rootflags= parameter like
so:
# root=/dev/mapper/btrfs_pool0 rootflags=subvol=rootPutting everything together you get something like:
title       Arch Linux
linux       /vmlinuz-linux
initrd      /initramfs-linux.img
options      cryptdevice=UUID=72347efa-f59b-de3a-42fe-02849feacc72:btrfs_pool0:allow-discards cryptdevice2=UUID=987aefcc-f119-56aa-43c1-48cffeaa891e:btrfs_pool1:allow-discards root=/dev/mapper/btrfs_pool0 rootflags=subvol=root quiet rw
Now the base system is completely installed an ready to boot! Feel free to add
some users, install some other simple packages you prefer, or any other basic
administrative tasks before you reboot into the installation. When you’re all
set, type exit to leave the chroot environment, unmount the subvolumes and
disks with umount -R /mnt/arch and then reboot. If all goes well, you
will boot into your new installation, asking you for the passphrase for each
disk. If there are any problems, boot back into the live disk, mount your
filesystems and compare the configuration files to the ones listed in this
article. The most likely culprits are your boot configuration, /etc/fstab,
and /etc/mkinitcpio.conf.
Post Installation Considerations and Niceties
A Warning About Kernel Updates
In the past, some kernel updates have been known to cause corruption to the filesystem, most recently in the 3.19.1 kernel where a deadlock prevented access. The issue was easily repairable, and is now fixed, however instability in your data storage can be frightening. To prevent this type of surprise, there are a few things that can be done. The simplest, if your hardware is supported, is to switch to a Long Term Support (LTS) kernel. These are released far less frequently and geared to provide the utmost stability. They are generally heavily tested before deployment to ensure that no bugs of this sort can creep up. If you must run a newer kernel, I recommend a reasonable external back up system of your most important files and waiting a few days to upgrade after a new kernel version is released, in hopes that any such bugs can be discovered and promptly patched.
Snapshots
Snapshotting, again, is a wonderful feature of Btrfs that allows us to take fast, lightweight backups of a subvolume. Each snapshot essentially freezes a file in in the state is it at that moment. If a file hasn’t changed since a year ago, that file in each snapshot is the same exact location on the disks, a file in a snapshot only takes up space if it were to change. Because of Btrfs’ copy-on-write mechanisms, when you change a file, it is written to a new location and the previous snapshots are unaffected, and if you were to delete a file that was previously snapshotted, the file tells Btrfs “Hey, I’m still wanted in this one snapshot…so don’t forget about me!” and those blocks are not freed. If something were to happen to a file or directory, we can simply roll back to an appropriate snapshot and retrieve that copy.
To make a snapshot, first change directories into the /var/lib/btrfs_root
directory you made earlier. Run ls and you should see all of the subvolumes
you created. Feel free to poke around inside of them and see exactly how the
system is assembled. When you’re ready to make a snapshot, run mkdir
snapshots to create a directory to store them in. This is just a standard
POSIX
directory at the top most level of your Btrfs system.
I like to organize my
snapshots by date, so I usually create a new subdirectory in
/var/lib/btrfs_root/snapshots named after the date. For example, mkdir snapshots/$(date +"%F_%H-%M") would create the directory snapshots/2015-09-02_14-56/ because I ran it at 2:56pm on September 2nd, 2015. This way of organizing snapshots works for me, but by all means, use something that is intuitive to you! To actually create the snapshot use your good pal, the btrfs command like so:
# btrfs subvolume snapshot <subvolume name> snapshots/2015-09-02_14-56/So for the system installed in this article:
# btrfs subvolume snapshot root snapshots/2015-09-02_14-56/
# btrfs subvolume snapshot home snapshots/2015-09-02_14-56/
# btrfs subvolume snapshot var snapshots/2015-09-02_14-56/
# btrfs subvolume snapshot data snapshots/2015-09-02_14-56/
To verify, run ls in the snapshot/2015-09-02_14-56/ directory. You don’t have
to snapshot every subvolume at the same time, for instance, your personal data
in home is likely to change more and you may want to snapshot more often to be
able to revert to a very recent state.
Btrfs snapshots are very powerful, and can be scripted by hand or with various tools such as openSUSE’s Snapper. These operations are outside of the scope of this tutorial, but are by no means difficult to do, so have fun checking them out!
Keyfiles and Additional LUKS Keys
One of the most appealing aspects of the LUKS containers is the ability to have up to 8 keys that are able to unlock the container. The keys can be text entered interactively at a prompt, like a standard password, or keyfiles, any standard file, such as a picture, a song, a pdf…anything you could store on a hard drive! Additional text keys are helpful to have an unlocking mechanism in case you forget or damage another key. Keyfiles are nice as a quick, automatic way to decrypt devices when in a safe place, or to have a key much longer than a memorable text one.
For example, my ThinkPad has an SD card slot. When I am at home, a keyfile on the card is used to automatically decrypt the drives in my Btrfs pool at boot. If I leave the house, I simply eject the SD card, and when I startup the computer, I am asked for the passphrases for both of the involved disks.
To add new key, use the cryptsetup luksAddKey command. To add a key to the
LUKS container at /dev/sda1 for example:
# cryptsetup luksAddKey /dev/sda1The command will prompt you to type in an existing key and then have you type the new passphrase twice.
If you would like to add a keyfile instead, simply add the path of the file to your command:
# cryptsetup luksAddKey /dev/sda1 /path/to/fileOnce you enter in an existing key, the keyfile will be added. Revoking keys is not difficult, but not in the scope of this article. For more info on LUKS management, check out the Arch Wiki page dm-crypt/Device encryption.
Assuming that you added a keyfile to each partition’s LUKS header, you may now
setup your computer to use those upon boot thanks to the encrypt hook.
Change your boot loader configuration entry’s options line to include cryptkey
and cryptkey2 options in the format
cryptkey=/dev/disk/by-uuid/xxxx-xxxx:<filesystem
type>:/path/from/toplevel/of/device
For example, to use a keyfile on my SD card
I would have the following options line:
options cryptdevice=UUID=6e3e4026-5b53-4bc0-8980-ffe59765f85d:btrfs_pool0:allow-discards cryptdevice2=UUID=16d8e0bf-5384-4f5d-a785-9c7eaf775fa4:btrfs_pool1:allow-discards root=/dev/mapper/btrfs_pool0 rootflags=subvol=root cryptkey=/dev/disk/by-uuid/F224-CEA1:vfat:/cats.gif cryptkey2=/dev/disk/by-uuid/F224-CEA1:vfat:/cats.gif quiet rwThough absurdly long, it is important (at least for my bootloader) that it all to be on one line.
Now reboot, and if your keyfile is present on the specified removable media, your LUKS containers should automatically unlock themselves. If your removable media is not present, you will be brought to the standard prompt to type a key in by hand.
Encrypted Swap
If you chose to have a swap partition on your system, it is a good idea to encrypt it. The process is quite simple and unobtrusive, requiring just a slight change to both /etc/fstab and /etc/crypttab, with no additional passwords or anything at boot since they are encrypted with a one-time random “throwaway” passphrase.
First, in /etc/crypttab, find the line with the swap entry:
# swap /dev/sdaX /dev/urandom swap,cipher=aes-cbc-essiv:sha256,size=256and uncomment it. Then replace /dev/sdaX with the UUID of your swap partition in the same way you did for /etc/fstab and our boot options. It is extremely important to use the UUID here!: in the boot options or /etc/fstab, if the wrong partition was referenced, the system would simply not boot until it is fixed. Here, however, the partition would be rendered completely corrupted after mkswap gets called and a dm-crypt container is created.
Now edit /etc/fstab. Find the line for the swap partition and change the partition to /dev/mapper/swap like so:
/dev/mapper/swap none swap defaults 0 0this indicates that swap partition will be the “swap” container that you just told /etc/crypttab to create at boot time.
Conclusion
I hope that you have found this guide to be informative and helpful. While it is quite thorough in explaining the set up process, there is much more to learn and use now that your system is up and running. From automated snapshot management, to LUKS header backup and removal, from Btrfs filesystem hygiene practices, to further securing your system; there is a plethora of further fun, security and data integrity topics to explore with these tools. Have fun and enjoy.
feel free to contact me with any comments or corrections via the options listed at the bottom of the page.
