SysEx-ploration
Using MIDI system exclusive messages to improve the experience of editing presets on the Akai MPD32 USB MIDI controller
Motivation
I recently purchased an Akai MPD32 MIDI controller from a swell person on craiglist. I wanted a relatively small controller that had enough knobs and sliders to map to various parameters when sketching out ideas in ChucK and Faust, and this seemed like a perfect solution…plus 4 banks of 16 pads with independent pressure tracking!

I plugged it in, did a little pad tapping, a little knob turning, and a little fader fading. It was quite nice. However, on every preset, each pad was set to channel aftertouch and not polyphonic pressure sensing, and the pads were arranged chromatically always starting at C. No worries I thought, I could just spend a few minutes changing those to my liking. I was horribly mistaken.
After entering edit mode, setting the pressure requires 6 button presses for each pad. With 64 pads to set, that’s 384 presses plus the bank change presses. And don’t even get me started on changing the pads to diatonic from chromatic! There had to be a better way. I noticed that the Akai website had a download for the Vyzex preset editor, so I decided to give it a shot. I installed it in my Windows 10 VM, and redirected the MPD32 USB to it no problem. I fired it up and was greeted with a nice splash screen letting me know that the copyright date was 2007…and it showed. Apparently in 2007, nobody could fathom that screens would be above 1024x768, as the window is tiny and nonadjustable on a relatively modern screen. But, if it would make editing easier, I could live with those. I was hoping for bulk edit of pads, increment/decrement buttons for values, and toggle switches for options. I got text boxes. Click a pad, then click the note field then enter value in a text box. Womp womp, this wasn’t a solution either.
So when faced with only two systems that are difficult to interact with, what should one chose? A third!

Idea
I noticed that in the GLOBAL menu on the MPD32, there is a SysEx Tx option to transmit the MIDI System Exclusive representation of a single preset to another device. I had encountered SysEx in the past when I wanted to back up my Yamaha DX-7 patches to a computer, but knowing nothing about its data representation, ‘twas a pure mystery to me back then. Now, equipped with 3 years of CS knowledge, I figured I could certainly grok the format enough to write my own editor…and that is just what I did!
The System Exclusive Specification
Since I was going to be extracting meaning from a SysEx dump, it would probably be a good idea to see exactly what the SysEx specification is. I referred to a couple of sites, and learned the entire specification in about 20 seconds. I’m not saying that to sound boastful, its just that the entire specification, for better or for worse is:
| 0xF0 | 0xXX, 0xYY, ... | 0xF7 |
| SysEx Begin | Any amount of data arranged in any way | SysEx End |
Luckily, the MIDI Manufacturer’s Association adopted the following convention to specify which device a message is intended for.
| 0xF0 | 0xMM | 0xMM | 0xMM | 0xPP | 0xXX, 0xYY, ... | 0xF7 |
| SysEx Begin | Manufacturer ID | Product ID | Any amount of data arranged in any way | SysEx End | ||
It also seems that usually the first data byte will provide some sort of opcode-like purpose, declaring the intent of the message. With all this in mind, lets look at the MPD32 data.
Dumping the Data
I used the amidi from the alsa-utils suite of programs to accomplish most of this task. First, I needed to find the device ID, which is easily found with the list (-l) flag
$ amidi -l
Dir Device    Name
IO  hw:1,0,0  Akai MPD32 MIDI 1
IO  hw:1,0,1  Akai MPD32 MIDI 2
I   hw:1,0,2  Akai MPD32 MIDI 3
The MPD32 is quite flexible, so it provides 3 virtual devices, yet as it turns out (from trial and error),
only the first one transmits and receives SysEx messages, so I used that one from there on out. Note the
“Device” field lists it as “hw:1,0,0”, which is the value to be used in the
upcoming steps when interacting with the device. Next, I used the port and
receive flags for amidi to store the data to a file called mpd_dump.syx.
First, I navigated to the SysEx Tx page so as to not clutter the dump with
realtime button press info. Then after running the following command, I pressed the
enter knob to initiate the transfer, and pressed Ctrl+C to stop receiving:
$ amidi -p hw:1,0,0 -r mpd_dump.syx
^C
1033 bytes read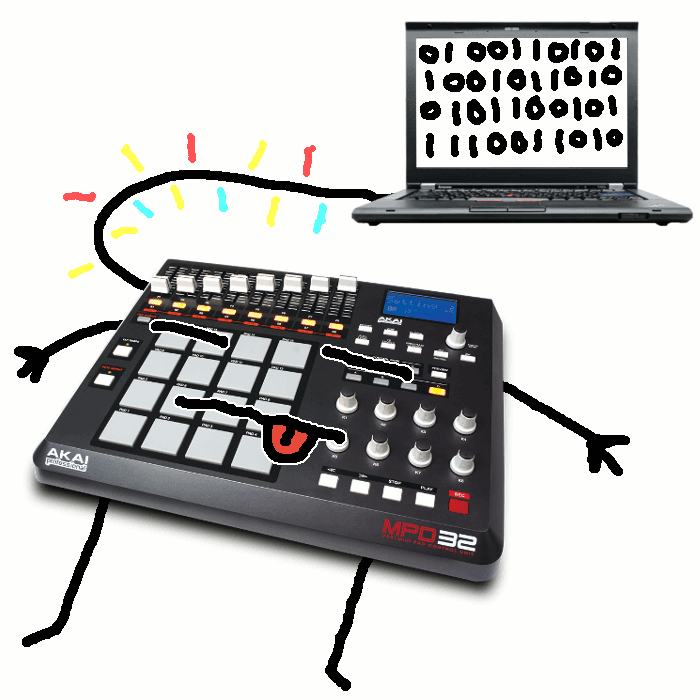
Wow. So 1033 bytes. That is a fairly hefty amount of data to sift through, so
first I need to verify that it was actually the preset dump. First, a simple
hexdump on the SysEx file, confirms that it starts with an 0xF0, and ends with
an 0xF7 (remember, little endian!).
$ hexdump mpd_dump.syx
47f0 6c00 0810 1e01 6547 656e 6972 2063
7800 0401 3201 013a 0204 323c 0300 0101
0002 0000 0000 0000 0000 0000 0003 0024
0001 0000 0003 0025 0001 0000 0003 0026
# many lines omitted for space!
6f00 0001 0000 0000 0170 0000 0000 7100
0001 0000 0100 7f00 0000 0b01 7f00 0100
0040 0000 4001 0000 00f7
Furthermore, the preset was called “Generic”. Assuming that the name is stored
in an ASCII-like format, the strings command would find it.
$ strings mpd_dump.syx
Generic
Bingo! So I knew I was definitely dealing with the correct data, but how could I know which of the 1033 bytes did what?
Deciphering the Data
The most obvious way to determine which byte was associated with which
parameter, was to change some
parameters and track the deltas between the Generic dump and the new ones. But again, I’m doing this all to
save work not make more and that sounds like quite an undertaking! Since I was tracking changes or differences,
perhaps there was a standard tool I could use to, such as…python! Oh yeah, it
would probably be helpful to use diff too. I wrote a script that encapsulated
the following flow:
- Write a program that takes a raw binary SysEx message, and outputs it as hex
values, one per line.
- Run it on the Generic mpd_dump.syx file
- Run it on the modified mpd_edit.syx file
diffthe two outputs to calculate any lines that have changed. Because there is only one byte per line, the line number - 1 is the byte offset in the SysEx dump- Prompt for a comment on what I changed
- Append the byte number, the generic value, the new value, and the comment to a .csv file
- Assess if a coffee refill is needed
- Repeat steps 1.2-5 until all desired parameters are mapped.
It became clear pretty quickly that the data was arranged in a very
intuitive manner! For example, I began with the 1st pad, and changed it’s menu
options one by one, and found that they are arranged in the dump in the same
order they appear on the screen. Furthermore, the biggest relief was to find
that the data for all pads is stored identically and sequentially! After
mapping the first pad (8 bytes), and the second pad, my prediction of where the
64th pad should begin was spot on: PAD_BEGIN + (PAD_WIDTH * padNum), where
the respective values are 0x2C, 0x08, and the pad number desired (zero-indexed).
I ended up with the following map of how pad parameters are stored:
| Offset from 0x2C + (0x8 * Pad #) | Parameter | Values |
| 0x00 | Mode | 3:Note, 4:Program Change |
| 0x01 | Channel | 0:Common. 1-3 |
| 0x02 | Note Number | 0-127 |
| 0x03 | Trigger mode | 0:Momentary 1, Toggle |
| 0x04 | Pressure Mode | 0:Off, 1:Channel Press, 2: Polyphonic |
| 0x05 | Program Num | 0-127 |
| 0x06 | Bank MSB | 0-127 |
| 0x07 | Bank LSB | 0-127 |
The layout was similar for the knobs, switches and faders, each of which have 8 physical * 3 banks = 24 virtual units. They all varied in the different ways they can be configured, some controls requiring 7 bytes, some only 5. Additionally there are a few one-off settings such as the note-repeat (drum-roll) button, tempo, playback control, etc. The final mapping of all parameters that were physically modifiable is:
| Byte | Field | Valid Values |
| 0x0000 | SysEx Begin | (0xF0) |
| 0x0001 | Mfg Id | (0x47) |
| 0x0002 | Mfg Id | (0x00) |
| 0x0003 | Mfg Id | (0x6C) |
| 0x0004 | Prod Id | (0x10) |
| 0x0007 | Preset number | 1-30 |
| 0x0008 | Preset Name Char 0 | Pretty much ASCII |
| … | … | … |
| 0x000F | Preset Name Char 7 | Pretty much ASCII |
| 0x0010 | (Presumed null char for string) | (0x00) |
| 0x0011 | Tempo | 30-300 |
| 0x0012 | Time Divide Mode | 0:Momentary 1, Toggle |
| 0x0013 | Time Divide Amount | 0:1/4-Note-7:1/32T-Note |
| 0x0014 | Note Repeat Mode | 0:Momentary 1, Toggle |
| 0x0015 | Note Repeat Gate | 0-99 |
| 0x0016 | Note Repeat Swing | 50-75 |
| 0x0020 | Transport Mode | 0:MMC, 1:MIDI. 2:MMC/MIDI, 3:CTRL |
| 0x002C | Pad Mode | 3:Note, 4:Program Change |
| +0x01 | Channel | 0:Common. 1-3 |
| +0x02 | Note Number | 0-127 |
| +0x03 | Trigger mode | 0:Momentary 1, Toggle |
| +0x04 | Pressure Mode | 0:Off, 1:Channel Press, 2: Polyphonic |
| +0x05 | Program Num | 0-127 |
| +0x06 | Bank MSB | 0-127 |
| +0x07 | Bank LSB | 0-127 |
| 0x022C | Knob Mode | 0:Control Change, 1:Aftertouch. 2: Inc/Dec |
| +0x01 | Channel | 0:Common. 1-3 |
| +0x02 | Control Change Number | 0-127 |
| +0x03 | CC/Aftertouch Min | 0-127 |
| +0x04 | CC/Aftertouch Max | 0-127 |
| +0x05 | NRPN Left | 0-127 |
| +0x06 | NRPN Right | 0-127 |
| 0x02D4 | Fader Mode | 0:Control Change, 1:Aftertouch |
| +0x01 | Channel | 0:Common. 1-3 |
| +0x02 | Control Change Number | 0-127 |
| +0x03 | CC/Aftertouch Min | 0-127 |
| +0x04 | CC/Aftertouch Max | 0-127 |
| 0x034C | Switch Mode | 0:Control Change, 1:Program Change |
| +0x01 | Channel | 0:Common. 1-3 |
| +0x02 | Control Change Number | 0-127 |
| +0x03 | Trigger mode | 0:Momentary 1, Toggle |
| +0x04 | Program Number | 0-127 |
| +0x05 | Bank MSB | 0-127 |
| +0x06 | Bank LSB | 0-127 |
| 0x0408 | SysEx End | (0xF7) |
Color key:
| Pad data block | Knob data block | Fader data block | Switch data block |
Working with the Data
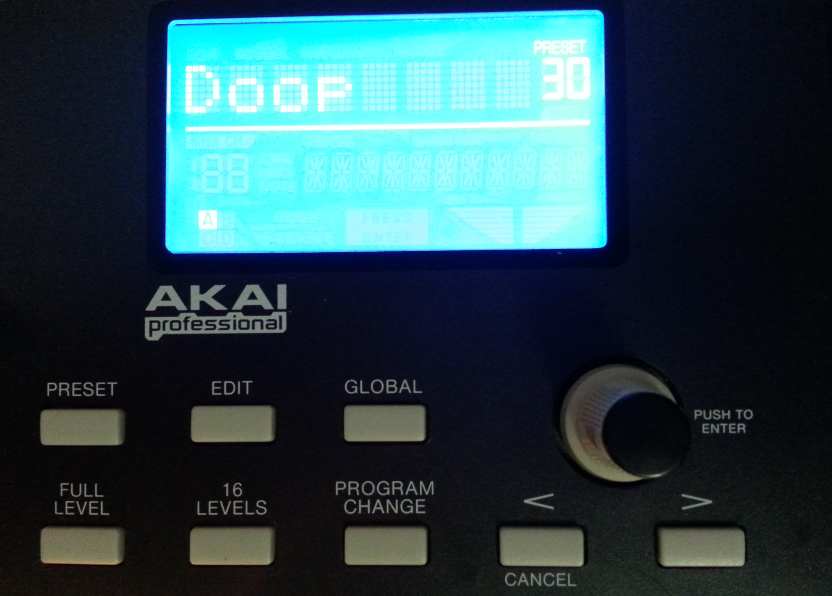
So there it was, my very own preset map! Now I had the key to whatever configuration I could dream up! I did a quick test to verify that uploading a .syx works, by changing the mpd_edit.syx’s name bytes from “Generic” to “Doop” (with spaces filling in the remaining 4 bytes) in the bless hex editor
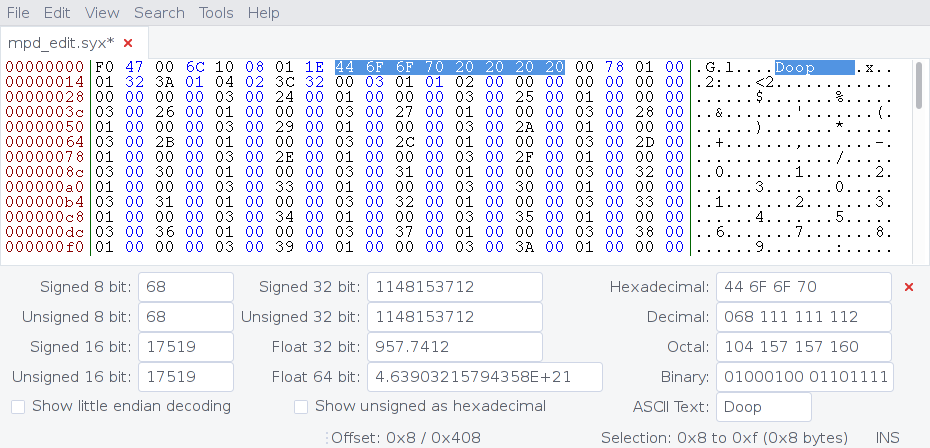
and then uploaded it with our good pal amidi
$ amidi -p hw:1,0,0 -s mpd_edit.syxand what do you know…it worked!
With basic editing and uploading confirmed to be working, I could finally code
any patch I wanted: polyphonic pressure, diatonic scales, momentary
buttons…anything! I have plans to develop this into a GTK app, ideally one
that can edit many different MIDI controllers, but below is a snippet
demonstrating low-level manipulation of the .syx file. Then I can use aplay,
just like above, to upload this patch to the MPD32.
from struct import *

PAD_BASE  = 0x2C
PAD_WIDTH = 0x8
PAD_MAX   = 0x40

SWITCH_BASE  = 0x34C
SWITCH_WIDTH = 0x7
SWITCH_MAX   = 0x18

WHOLE     = 2
HALF      = 1
MAJOR  = [ WHOLE, WHOLE, HALF, WHOLE, WHOLE, WHOLE, HALF ]

# Load base file into list of bytes
with open("mpd_dump.syx", mode='rb') as file:
    rawSysex = file.read()
sysex = list(unpack("B" * len(rawSysex), rawSysex))

# Set all pads to polyphonic aftertouch!
for i in range(PAD_MAX):
    sysex[PAD_BASE + (PAD_WIDTH * i) + 0x4] = 2

# Arrange the pads to the E major scale!  (MIDI note 28 = E1)
step = 0
base = 28
for i in range(PAD_MAX):
    sysex[PAD_BASE + (PAD_WIDTH * i) + 0x2] = base
    base += MAJOR[step]
    step = (step + 1) % 7

# Set all of the buttons to momentary!
for i in range(SWITCH_MAX):
    sysex[SWITCH_BASE + (SWITCH_WIDTH * i) + 0x3] = 0


# Write modified values to new file
with open("mpd_edit.syx", mode='wb') as file:
    file.write(bytes(sysex))
Moving Forward
Like I said, my next step is turn this into an extensible GUI app, so I would have to take care to design it in such a way that facilitates easy community creation of other controllers. Furthermore, the very offline workflow of receive .syx, modify .syx, send .syx could be replaced by dynamic, realtime editing, including synchronized editing in the device and the app. I know that the MPD transmits and receives these events, using much smaller 10-byte realtime messages reflecting just the edited parameter. This workflow is a bit nicer in that changes are instantly synced to the device, and can be experimented with on the fly, while the device is in use even.
This exercise taught me a lot, and I look forward to seeing where this goes…not to mention making some quite expressive instruments and grooving with them!

feel free to contact me with any comments or corrections via the options listed at the bottom of the page.
